One way to increase the traffic to your website is to get more people to share the content on Pinterest. Since people naturally like to see what is popular with other people and to share that content with their own followers, you can get more people to share your articles on Pinterest by simply showing them the ones that are already pinned a lot.
How To Create a Popular Pins Widget for Your Sidebar:
It’s not hard to display your most popular pins in your sidebar, but it does take a few steps.
- Find out which of your content has been shared on Pinterest the most.
- Create a text widget with an image of the post that links back to the article.
- Create a Pin It button that shows the Pin Count for the article and add that code below the image.
Find Your Most Pinned Content:
Pinterest makes it easy to see all of the pins that have been pinned from your website. In your browser, go to: http://www.pinterest.com/source/YOUR URL (replace YOUR URL with your domain name – do not include the http://www.) For this website, I would type in: http://www.pinterest.com/source/futureexpat.com/
If you have verified your website, you will see the bar that is just below the domain name that allows you to see site metrics, most recent pins, most repinned and most clicked pins. If you haven’t verified your website (you can only verify one website per account), then you will have more limited information, but you can still scroll down and see which articles are popping up the most. Make a list of the articles that appear to be repinned the most. Then go to Pinterest Pin Count to find out exactly how many times each of the articles has been pinned.
Paste the URL of the blog post or page you want to check into the page and click Get Pin Count.
Go through your list of probably highly pinned articles and see which ones have the most pins.
Once you know which articles have been pinned the most, now you are ready to create a sidebar widget to display those posts.
Create a Sidebar Widget to Display Your Most Pinned Content:
 I decided to show my 5 most popular pins. For each blog post, you will need:
- URL of blog post or page you want displayed
- URL of the image you want displayed (you don’t need to resize this picture for your widget width if you use WordPress). If you don’t have an image already with a caption on the image, I suggest you use PicMonkey to create one.
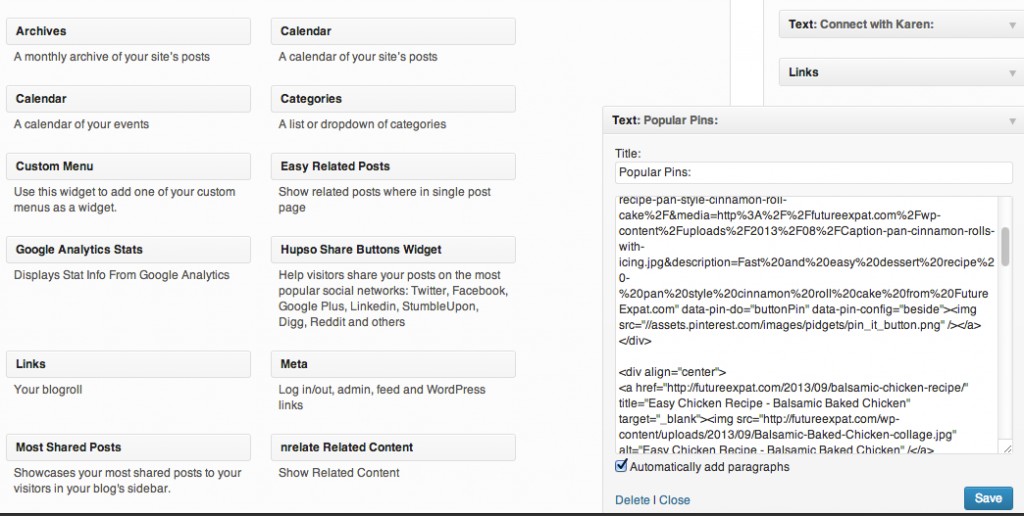
In your WordPress dashboard, go to Appearance –> Widgets.
Drag a text widget from the list of available widgets to the spot in your sidebar where you want the Popular Pins widget displayed.
Give your widget a title. I called it Popular Pins.
Check the box at the bottom to automatically add paragraphs. This will put a space between each pin.
Here’s the hardest part. You’ll have to paste some code into the widget and then add the URLs you identified for the post and image, along with some alt text. But it’s not really all that hard and I’m giving you step by step directions.
Image Code:
Paste this code into the text box.
<div align=”center”> <a href=”ADD YOUR PAGE OR POST URL HERE” title=”GIVE YOUR PAGE OR POST A TITLE” target=”_blank”><img src=”ADD YOUR IMAGE URL HERE” alt=”GIVE YOUR PAGE OR POST A GOOD ALT TEXT DESCRIPTION HERE” /</a> </div>
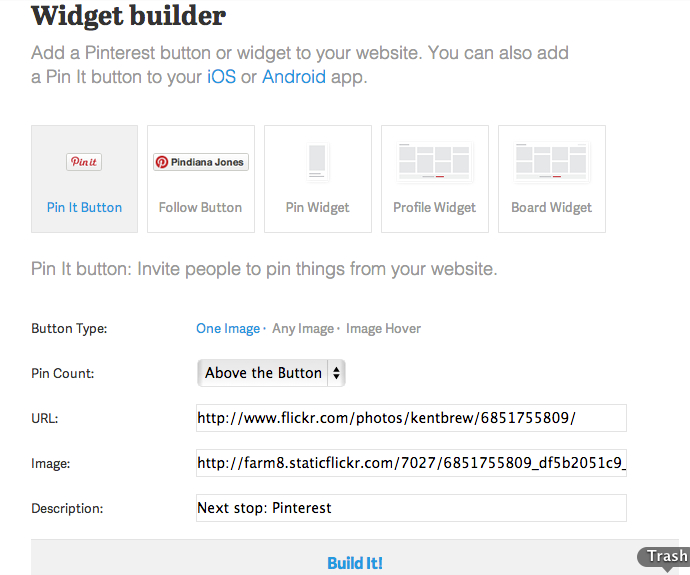
Replace all of the items that are in ALL CAPS with the described item. I normally use the same description for the title and alt text. Pin It Button: Now you need to add the Pin It Button. Go to the Pinterest Widget Builder.
- Choose the first option on the left – Pin It Button
- Button Type – One Image
- Pin Count – Beside the Button
- URL – paste the URL of the blog post or page
- Image – paste the URL of the image that will be pinned if someone clicks the Pin Button. This image will not show up in your sidebar, it will only show up if someone uses the Pin It button to pin your post.
- Description – this is the text that will be used to describe your pin if someone clicks the Pin Button to pin your post. Keep it short and catchy. Just like #5 above, this will not show up on your website.
- Click Build It.
- Copy the code that you received and paste it below the code in your text widget. Save your widget.
- Copy the javascript at the bottom of the Pinterest Widget builder page, or simply copy this: <script type=”text/javascript” src=”//assets.pinterest.com/js/pinit.js”></script>
- Paste the Javascript in the header or footer theme options. If you are using a theme that doesn’t give you the option to paste code into one of these places, you can contact your theme developer to find out how to add the code to your site. On my Arch City Homes website, the theme developer had me download the Code Snippets plugin and then he gave me code to create a snippet that added the Javascript to the correct place. Or, simply add the WordPress plugin Header and Footer by Stefano Lissa. (NOTE: You only need to do #9 & #10 one time and all Pinterest Widgets will work on your site).
- Go to your website to make sure your new widget is displaying correctly.
Hit enter if you want a space between your popular pins, then repeat the process to generate the code for the image and the pin it button for your next most popular pin. I know this looks scary if you don’t know code, but it really is very easy. Just do it one step at a time and you’ll have a Pinterest popular pins widget to share your best content with your readers.


Great tip. I’ve certainly underused Pinterest for my blog but will give this a try. Thanks!!
Thanks so much for this! Can’t wait to put this on my blog.
Very detailed instructions….I love it! I tried to create one before, but it never worked correctly. I can’t wait to give your’s a try!! Thanks so much. 🙂
Thanks for this post! I am all thumbs with technology! This will help out a ton! I found you on Joyful Healthy Eats Show Stopper linky party!
This is so cool!! I’ve never seen a widget like this, but what a GREAT idea!!! I’m going to have to give this a whirl this weekend!!
Found you via the awesome Carli on Real Into, and I’m so happy I did! Wonderful (and helpful!) post!! –Lisa
This is great! I have a question as I am entering the code the images show the pin it button with the count, but as soon as I go to the next one the count disappears?!?!? Might you know what is going on?? I appreciate the tutorial and any help you might be able to give me!
I have no idea why that would happen unless you haven’t added the script to your header section. You need that in order for the Pinterest widgets to stick.
The script is in my footer section, would that make a difference? I guess I will ask the folks at Pinterest! 🙂
I believe it has to be in the header section of every page as their instructions are to put it:
Immediately load our JavaScript. For best results, put it just above your closing tag.
If you are using WordPress, try adding the Header and Footer plugin so you can put it in the header and see if that fixes the problem.
Congratulations Karen! Your amazing tutorial on How to create a popular Pinterest Widget for your sidebar is one of my Top Features from last week’s Sweet Wednesday Link Party! Stop by and grab a feature button and check out the other top features at: http://www.my-sweet-mission.com/2013/11/top-features-from-swlp-11.html
Hugs,
Heather
MySweetMission.net
Thanks for the great tip! I have been trying to figure this out for awhile now.
I’ve done this a long time ago in the past. I just tried to update my sidebar with my more recent posts by following your directions. Everything worked except that my pictures didn’t show up. The pin it button is there with the count but no picture. Any idea how to fix this? Are you sure I don’t need to resize my pictures? I do use self hosted wordpress. Thanks.
It’s probably a problem with the html in your widget for the pictures. I’m not a html expert. What I would suggest is to add the pictures in thumbnail size to a draft post, then grab the html from the text tab. Then paste the code into the widget. That’s how I get html since the draft post let’s you use the WSYWG buttons and media gallery to insert images…and will give you the proper html.
The picture doesn’t show up because of the speech marks. If you look closely they’re different to the standard “” (they’re kind of curved in the code in the post, so it’s not recognized). When I replaced all the speech marks by typing in ” the images showed up. Hope that helps.
Thanks so much for a great widget!
I see from my comment above that it’s the font on your blog that makes the speech marks curved. So in Notepad I replaced the speech marks in your code by typing them in myself. The speech marks should look like two straight lines (not italicized).
I don’t know if it’s because of my theme or what, but it doesn’t seem to be working. I finally got one post to go in, but when I tried to add a second one, it only showed the second one, even though when I pull up the text widget on my dashboard, it shows all the information for the first one. Any ideas? I’m kind of new at all of this, so I’m very easily confused!
Unfortunately, I don’t have an answer for you. I wrote this tutorial 3 years ago and I’m sure a lot has changed on Pinterest in that time. I haven’t kept up with Pinterest much lately so I’m not sure what to suggest.