Resizing Photos for Beginners
Before I became a blogger, I never needed to worry about resizing pictures.
The biggest issue I had was getting my pictures stuck in my outbox when I tried to email ones with file sizes that were too large.
That’s an easy enough problem to solve using just about any file editing program. You simply re-save the picture as a lower quality image.
Setting Picture Size Using Pixels:
Becoming a blogger changed everything for me. Suddenly I needed pictures that were a specific pixel size. Often I just need to make a picture smaller, but other times shrinking a picture to fit a specific spot in my website means it would be distorted if it wasn’t cropped. But most cropping tools don’t allow you to set the pixel size of the new image.
I’ve found 2 FREE tools that make resizing pictures easy and done in seconds.
SEE ALSO: Pinterest Tool: Combining Multiple Photos into a Single Pin
Shrink-O-Matic:
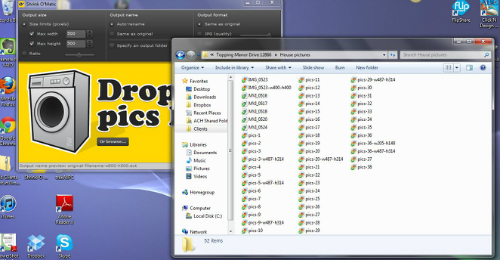
I’ve been using this free software for a few years now and it is the fastest way to make a picture smaller. I simply open Shrink-O-Matic on my computer, then open my file folders and navigate to the picture I want to re-size. You’ll need to make sure that you can actually see at least a small portion of the Shrink-O-Matic window.
After you have the settings the way you want, you simply drag the file into the Shrink-O-Matic yellow box and it makes the changes instantly.
In the Shrink-O-Matic window you set the size of the new picture. For my general website pictures, I always set it for 500×500 and I leave the ratio slider in the center, which is the default. This makes sure that the longer dimension is 500 px and the shorter one is the correct length to keep the ratio intact and eliminate distortion.
On my real estate website, I use big images that are 487 x 314 and smaller images of 205 x 148 for my featured listing pages.When I’m resizing pictures for these pages, I put in the exact dimensions since I want every picture to be exactly the same and any minor differences between the original picture size won’t cause noticable distortion.
I have it set to auto-rename, which keeps the same file name but adds the dimensions you specified. So a picture that is call House would be renamed House w500-h500.
By default, the new picture is saved in the same folder as the original, which I like. But you can also choose another location if you prefer.
Finally, you choose if you want the image to be a JPG, GIF or PNG. If you choose JPG, then you can also chose the quality. By lowering the quality, you lower the file size so you can easily email images or upload them to services which have a file size limit.
Shrink-O-Matic is really so easy that anyone can do it.
SEE ALSO: Protect Your Photos on the Web with Watermarking
Web Resizer:
The other service I use to re-size pictures is Web Resizer.
You can do the same things here that you can do in Shrink-O-Matic, but it isn’t as fast since you have to go to the URL, upload your picture, make your changes, download the new picture and then save it in the location you want.
It’s still easy, but it take a few more steps.
However, I really love how this website allows me to crop a picture so that the new picture is exactly the pixel size that I need.
The home page of this site requires a picture that is 900 x 350 pixels. Exactly.
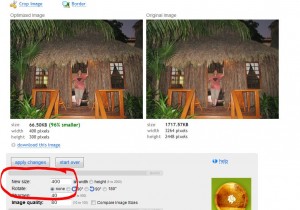
To get the image that I wanted, I went to Web Resizer and uploaded my image. During the upload, it was resized to a smaller image automatically, so I had to change it to the width that I wanted.
In this case, I changed it to 900 pixels.
 Click on this image to see a bigger view
Once the image was the correct width, I then clicked on the Crop option. I set the size of the image I needed and it gave me a dotted line box that I could move around until I was ready to save my changes.
That’s it. Once you apply the changes, you simply download the new picture and save it to your computer.
What easy tools have you found to work with pictures?
SEE ALSO: Create Multiple Picture Image Pins for Pinterest


